According to JB/T4127.1-1999 Technical Conditions for Mechanical Seals, the flatness of seal end face shall not be greater than 0.0009mm, and its surface must be smooth and clean. Due to different materials, the surface roughness (Ra) shall be less than 0.2 μ m for metal or hard materials and 0.4 μ m for non-metallic or soft materials.
The reason why such a high flatness is required is to ensure that the leakage of the seal face is within the allowable range. In addition, reducing the surface roughness can increase the bearing area, thus increasing the bearing capacity of mechanical seals.
1、 Knife edge ruler observation method
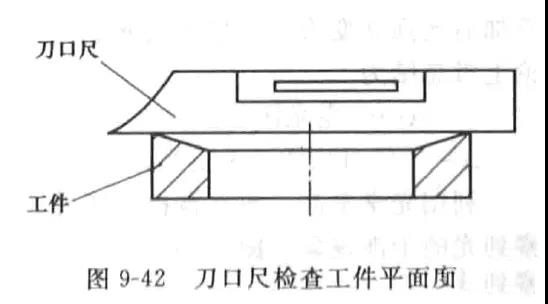
The blade of the knife edge ruler is a standard straight line. Place it on the workpiece surface to observe the gap size and uniformity, and the flatness of the working surface can be judged (see Figure 9-42). This method is applicable to the inspection of the workpiece with poor flatness, such as rough grinding workpiece.

2、 Point grinding method
The lapping method is to evenly apply a thin layer of display agent (such as red lead powder) on the surface of the workpiece to be inspected, and then place the standard plate on the surface of the workpiece to move back and forth smoothly, evenly, left and right, so that the plate and the inspected plane can be lapped together, lift the plate down, and observe the number and distribution of lapping points on the inspected plane, It means the flatness is better.
For the mechanical seal ring, the friction pair surface shall be coated with red lead powder, and then evenly lapped on the inspection plate to observe the contact condition. During maintenance, the flatness of the seal ring shall be inspected by the dynamic and static ring lapping method.
3、 Measuring flatness by optical interferometry
According to the requirements of relevant technical standards, the flatness of the mechanical seal ring surface is accurately measured using the interference principle of common light.
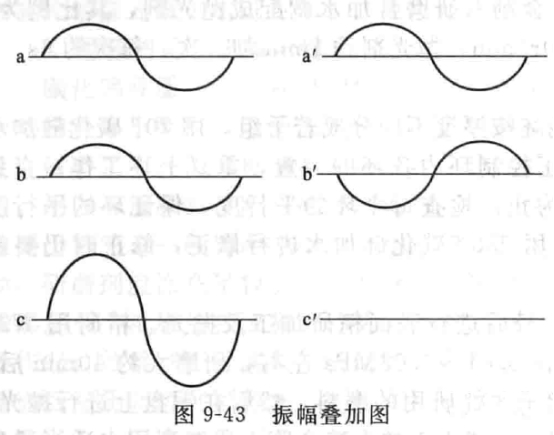
The wavelength or frequency of light can cause people's vision within a certain range. When the amplitude of light is small, the intensity of light (the degree of brightness or darkness) becomes smaller, and the two are proportional. When the light is emitted from the same point and coincides with a certain point in space, the amplitude changes and superposition occurs. As shown in Figure 9-43.
In the figure, a and b propagate in the same direction and are emitted by the same light source with the same phase. After superposition, as shown in c, the amplitude increases, so the light intensity is larger than the original, and the bright light area is seen.
In the figure, a 'and b' propagate in the same direction, but their circumferences differ by 180 °. After superposition, as shown in c ', the amplitudes cancel each other, so the light intensity becomes zero, and dark areas are seen.
When the light wave emitted from the same point is divided into two very thin light waves, the interference of light will occur - the bright light area and the dark light area are interlaced.

The basic principle of measuring flatness with optical flat crystal is described below.
Planar flat crystal is made of Pyrex glass, fused crystal or refractive index of 1 516 optical glass, making it a transparent glass with a straight working end face, with diameters of 60mm, 80mm, 100mm, 150mm, 200mm, 250mm, 300mm, 500mm, etc. Its precision is level 1 and level 2; The flatness of the working face is very high, and its deviation does not exceed 0.03 μ m and 0.1 μ m. The level-1 flat crystal is usually used to measure the flatness of the end face of the sealing ring, and the diameter of the flat crystal should be greater than the outer diameter of the measured workpiece.
The natural light from the sun is actually composed of several colors, each representing a different wavelength of electromagnetic waves. When the natural light passes through the flat crystal and shoots at the surface to be inspected, the interference fringes (rainbow) of several colors will be displayed at different positions. When using a monochromatic light source, bright and dark bands are produced, which are very clear. The interference band can be seen clearly, and the reading is more accurate. Monochromatic light source is generally nano light.
The principle of light wave interference detection method: the formation of interference fringes is the result of the brightness enhancement and reduction of two groups of light beams from the same light source after passing through different optical paths, and the brightness enhancement and reduction of the light beam is the interference of light waves.
Analysis shows that:
When the optical path difference δ of the two beams of light is an integral multiple of the wavelength λ, the light intensity increases after the interference superposition, showing a bright light area.
When the optical path difference of the two beams of light is an odd number of times of the half wavelength, the light intensity becomes zero after the interference superposition, showing a dark area. Theoretically, it can be summarized as
δ=κλ... bright area
∆=(2 κ+1) λ/2...... Dark area
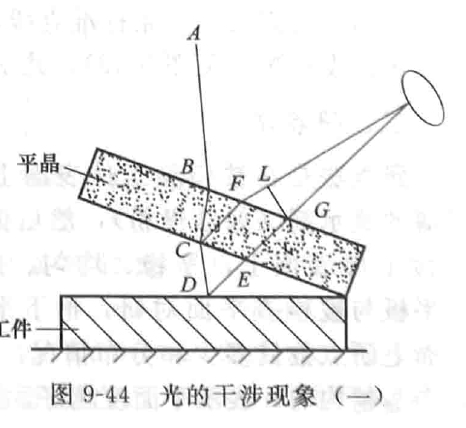
The interference phenomenon of light will be observed when optical flat crystal is placed on the surface of the tested workpiece (Fig. 9-44).

When the light is emitted from point A, it hits point B of the flat crystal, and part of the light is reflected in the direction of CF at point C of the plane below the flat crystal; The other part of the light passes through the air layer and shoots to point D of the workpiece surface for re reflection. After the two parts of light are reflected in the flat crystal, they interfere due to different optical paths. The optical path difference Δ is
△=(CD+DE+yEG) - (yCF+FL)
Y is the flat crystal refractive index.
Because CD=DE, CF=EG
So Δ=2CD-FL
Generally, the light source is almost perpendicular to the measuring surface. If the vertical distance from point D to the flat crystal is h, then DC ≈ h, FL≈0
So Δ≈ 2h
According to the laws of physics, when the light wave is reflected from the interface between the light dense substance and the light sparse substance, the difference between the perimeter of the light wave and the interface between the light sparse substance and the light dense substance is 180 °. So the actual optical path is δ
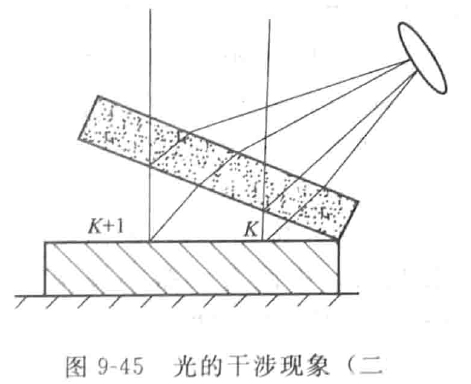
The relationship between the optical path difference corresponding to two adjacent interference fringes and the distance from the flat crystal to the workpiece is shown in Figure 9-45.

At K: δκ=2hκ+λ/2
At K+1: δκ+1=2hκ+1+λ/2
For two adjacent bright stripes, it can be obtained from the above formula
δκ=2hκ+λ/2=κλ
δκ+1=2hκ+1+λ/2(κ+1)λ
δκ+1-δκ=2hκ+1+λ/2-(2hκ+λ2)=(κ+1)λ-κλ
Because 2 (h κ+1-h κ)=λ
So h κ + 1h κ=λ/2
This formula shows that the optical path difference between two adjacent bright (or dark) stripes is λ/2, which corresponds to the flatness value. Namely, when the flat crystal is placed on the workpiece, the corresponding flatness value is λ/2 for each group of interference fringes.
For monochromatic light sources:
Sodium light λ=6000A=0.6 μ m;
White light λ=5000A=0.5 μ m;
If sodium light is used as light source,
λ/2=0.3μm=0.0003mm。
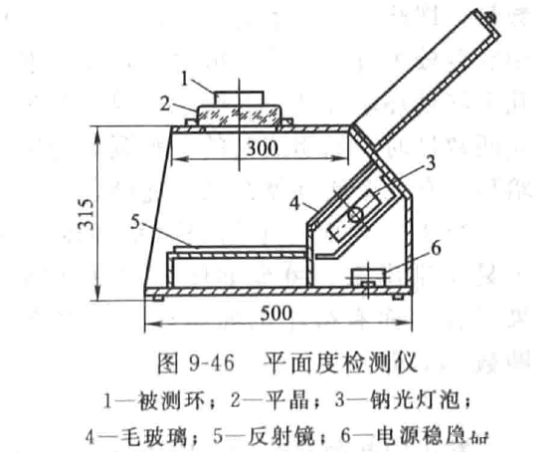
The flatness of the end face of the mechanical seal ring is required to be ≤ 0.0009mm, that is, sodium light is used as the light source, and flat crystal inspection is equivalent to less than three interference stripes. The actual inspection device is shown in Figure 9-46.

Judgment method Before measuring the flatness of the seal end face, the surface that can refract light must be obtained first. Usually, the measured surface is ground and then polished before inspection. During detection, the plane to be measured shall be closely attached to the flat crystal. Both surfaces must be carefully cleaned so that an extremely thin air film can be formed between the two surfaces. When a monochromatic light source penetrates the air film, it will produce interference fringes between light and dark.
During inspection, the surface of the workpiece shall be wiped clean. After the optical flat crystal is placed on the workpiece, the contact state between the flat crystal and the workpiece shall be carefully adjusted so that the interference fringes are the minimum number. Use the following formula to calculate the flatness
h=xλ/2
H - flatness value;
X - number of interference fringes.
For example, the sodium light lamp is used as the light source, and the minimum number of interference fringes observed is 2, that is, the flatness is
h=2X0.0003/2=0.0006mm
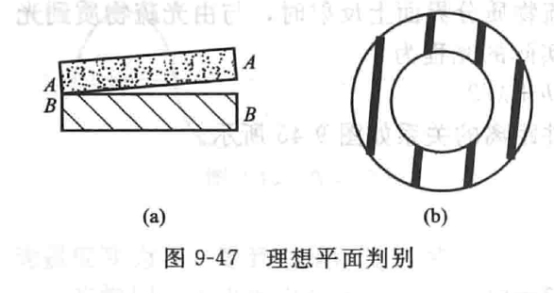
How to judge the flatness of workpiece from the obtained aperture shape is also a common problem in practical inspection. As shown in Figure 9-47, AA surface is a standard plane (i.e. flat crystal), The BB surface is the workpiece surface. If the inspected workpiece surface is also a good plane, when the AA surface is slightly inclined to the BB surface, the stripes appear to be straight [see Figure 9-47 (b)]. If the flat crystal is parallel to the workpiece surface, forming an air layer of equal thickness, the entire surface will show a uniform single color when using white light as the light source.

The color varies with the thickness of the gas layer. If the surface is partially uneven, the stripes are not a single color.
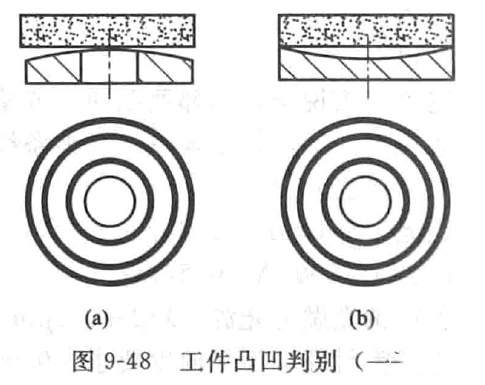
If there is a small curvature on the working surface, several colored concentric rings will be seen. When the middle of the workpiece surface is convex, the color of the concentric ring closer to the edge will be lighter [Figure 9-48 (a)]. The former is called high aperture, while the latter is called low aperture. If the aperture is high, when the workpiece is still moving and the observer lowers his head, he can see that the concentric ring expands outward and becomes larger, which is commonly called "running" outside the aperture. On the contrary, when the aperture is low, you can see that the concentric ring shrinks toward the center and becomes smaller, that is, the so-called aperture "runs" inward. Similarly, if the flat crystal is placed on the workpiece without inclination (parallel to the workpiece), and the aperture runs around, it means that the workpiece is convex in the middle, that is, the aperture is high. At the moment when the flat crystal is placed, the aperture runs from the periphery to the center, indicating that the workpiece is concave in the middle, that is, the aperture is low. When the light source is white, the aperture is colored. The number of apertures, that is, the degree of bulge or depression, is based on a certain color, and the number of apertures is calculated. As the red color is more eye-catching among the colored concentric rings, the red ring is generally taken as the standard. When the aperture is high, count from the center. When the aperture is low, count from the edge. A few red rings are counted as several apertures. If the light source is monochrome, such as sodium light, the concentric ring is a ring of light and dark. When calculating the number of apertures, the light or dark ring shall prevail, depending on the light and dark of the edge ring. If it is a dark ring, take the bright ring, otherwise take the dark ring. Several bright rings are several apertures.

When the flatness of the workpiece surface is about the same as that of the flat crystal surface, that is, when it is less than one aperture, it is difficult to identify it when it is placed as shown in Figure 9-47. It is necessary to place it as shown in Figure 9-49, so that the two surfaces are slightly inclined, and there is a small wedge angle in the middle. If the workpiece surface has slight curvature, the fringe will become bent. The ratio of the bending degree h of the fringe to the width a of the fringe is the aperture number N, that is, N=h/a
The method to determine the middle bulge or depression can be seen from whether the center of the bending stripe is on the thick side or the thin side of the air wedge. If the center of the circle is on the thin side of the air wedge, the aperture is high; Conversely, the aperture is low. As shown in Figure 9-49, N=h/a (aperture high) N=- h/a (aperture low)
A convenient way to determine the aperture height is to slightly press the edge of the flat crystal to form an air wedge between the flat crystal surface and the workpiece surface, which can be judged according to the relationship between the pressure point and the center of the bending stripe. When the center of the curved stripe is on the same side as the pressure point, the aperture is high. Conversely, the aperture is low (see Figure 9-49). However, this method should only be used when skilled, otherwise it is easy to crush the workpiece surface.
The identification method for irregular aperture, collapsed edge, wing edge, etc. is basically the same as the above method. As long as you master the basic method of recognizing the aperture height skillfully, you can recognize no matter how irregular the aperture is.
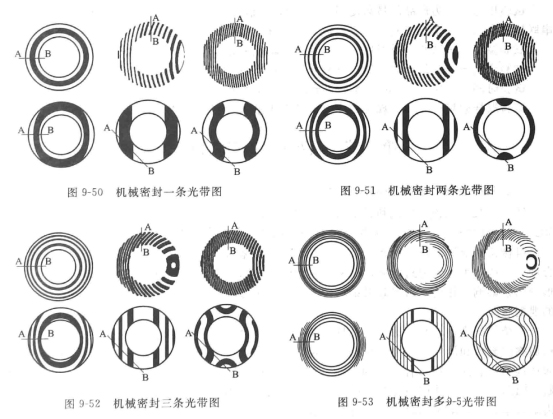
See Fig. 9-50 to Fig. 9-53 for the common light band diagram of mechanical seal.
